

Well 176 views so far for game one, but only one comment. However, let's now add game two in the hope that somebody out there will find it interesting! Remember to set out your bg board and play each move along with the text. it will stick in your mind better like that.
----------------------------- Game 02 ------------------------------
Match to 13. Score WHITE-BLACK: 0-4
BLACK: (6 3) 24/18 13/10
* 24/15 is thought to be equally good, but is rarely tried.
2. WHITE: (6 3) 24/15*
BLACK: (5 2) bar/18
3. WHITE: (4 3) 15/8
BLACK: (6 3) 24/18 13/10
4. WHITE: (5 1) 8/3 6/5
*In the previous game (Black M16) we saw that slotting two points inboard was correct, but for some reason it doesn’t work here! Perhaps there aren’t enough different cover numbers to make it worth while, or perhaps it doesn’t work so well when you start with a one point board. An interesting topic for research. The match play is an error costing about 0.059 (SE/GR).13/8, 6/5 is best.
BLACK: (5 4) 18/9
5. WHITE: (5 4) 8/3 6/2
*Losing four points in a game is very distracting, which is why top tournament players often take a short break when that happens, in order to regain their concentration. Clearly my mind is not on the job here as 24/15* is by far the best play in spite of my two blots inboard. I saw the play, but chose not to hit. The match play is a blunder costing about 0.147ppg (S/GE). Looked at another way, White wins about 51% if he hits, about 46.5% if he doesn’t.
BLACK: (6 6) 13/7(3) 10/4 (see diagram 6)
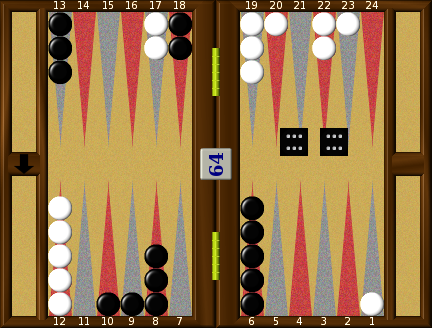
Diagram 6. Black to play 6-6.
Black leads 4-0 to 13
Pipcount Black 148 White 136
*Now it is Black’s turn to be wary of hitting and he gets it wrong too. As all the positional plays leave a direct shot, Black does much better to put White on the bar against a two point board. A dance for White after Black’s 13/1*(2) [11%] will get him cubed, although the take is quite easy. Note that 13/1*, 13/7(2) is also wrong. Hitting loose when you could cover is almost never correct. The match play is a blunder costing about 0.14ppg. For comparison, the match play gets about 53.5% wins with 12.5% gammons, but 13/1*(2) gets 55.5% wins with 19.5% gammons! (G/SR)
6. WHITE: (3 3) 24/21* 8/5(2) 5/2
BLACK: (6 4) bar/21 9/3
*White on roll should give some thought to cubing this. It isn’t yet a double, but it isn’t far off. Good decision to wait.
7. WHITE: (6 6) 21/3
BLACK: (4 2) 8/4 6/4
*White gained 18 pips on that last exchange and escaped his last back man. This is enough to just get him into the doubling window, a fact that bots can recognize, while humans tend to wait a roll with this sort of thing. A small technical mistake not to double I think, but not very important and impossible to evaluate over the board. If you think that you might have enough, but are not sure, what should be your strategy? A good plan is to ask yourself if there is any chance of a wrong pass. Even a 10% chance that your opponent will weakly drop can be enough to justify a marginal double. Any chance of that here? Not with this player!
8. WHITE: (1 1) 13/12(2) 5/4*(2)
*A good roll but played too carefully by White. Clearly 13/11, 5/4*(2) is better, risking 6-5 from the bar in return for bringing another builder to bear on the 5pt. The match play is an error costing 0.05ppg (SE/GR)
BLACK: (4 3) Can't move
9. WHITE: Double (see diagram 7)
BLACK: Take
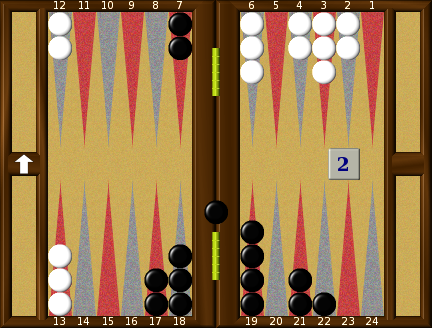
Diagram 7. White doubles to 2.
Black leads 4-0 to 13
Pipcount Black 133 White 102 Black is on the bar.
*Clear double for White and an equally clear pass. How does one decide this over the table? As White I ask myself, “If I were Black, am I sure that this is a take? Sure means 100% certain. If not absolutely sure, it must be a double for White†This is known as Woolsey’s Rule and is the single most valuable doubling guideline that you can have. As it happens I was certain that Black should pass this and equally sure that I wasn’t good enough to play on for a gammon, so doubling was an easy decision. Why am I sure that this is a pass? Any time that you find yourself on the bar against a four point board and with another blot somewhere, you probably have a pass. It’s particularly clear here, where White leads by 31 pips and has escaped his back men.
Black’s take is a big blunder, costing him about 0.230ppg G/SE.
10. WHITE: (4 1) 13/8
*Another slightly conservative play by White; the bolder 12/11, 12/8 is probably best (SE/GR) and the match play is a small mistake.
BLACK: (2 1) bar/24 6/4
*Gnu will play this but Snowie correctly prefers the sharper bar/24, 7/5. The match play is a very small technical mistake (SE/GR).
11. WHITE: (6 5) 8/2 6/1*
*Yet another cautious play when something bigger is called for. 12/1* is far better with more cover for the ace and two builders working directly on the 5pt. Backgammon is a constant struggle to balance risk against gain and here, with my stronger board, I should be taking more risks in order to win more games and more gammons while my opponent is off balance. The match play is a very big error costing about 0.105 (G/SR)
BLACK: (4 1) bar/24* 7/3
12. WHITE: (6 1) bar/24 12/6
BLACK: (4 2) 24/18
13. WHITE: (6 3) 12/3
BLACK: (3 1) 8/5 6/5
14. WHITE: (1 1) 24/23 3/2 2/1(2)
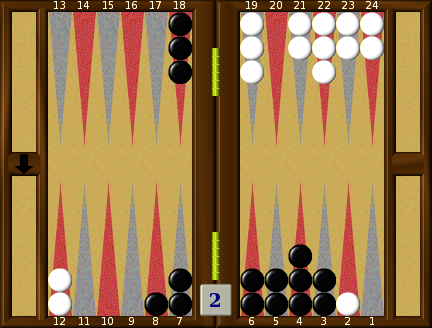
Diagram 8. Black on roll. Cube action?
Black leads 4-0 to 13
Pipcount Black 116 White 94
*For money, or if the scores were reversed, Black would be redoubling here. White could take for money but should pass if he led 4-0. At this score Black is nowhere near to a double. This is typical for the leader holding a cube in positions where there are still some gammons about. Good decision to wait.
BLACK: (2 2) 8/4 4/2*(2)
15. WHITE: (3 2) Can't move
*Now Black is too good to double and correctly plays on for the gammon. He will go on doing this until there are some sequences that might lose for him, then think again.
BLACK: (5 2) 18/11
*18/13, 18/16 is equally good.
16. WHITE: (3 2) Can't move
BLACK: (6 2) 18/16 11/5
*18/10 is equally good.
17. WHITE: (2 1) bar/24 6/4
*bar/24, 3/1 is equally good.
BLACK: (6 6) 16/4 7/1*(2)
18. WHITE: (3 1) Can't move
BLACK: (1 1) 18/14
19. WHITE: (4 1) Can't move
BLACK: (3 3) 14/5 4/1
*Both the bots play 14/2, preferring to have the spares on three different points and risk 6-6 and 5-5. The rollouts suggest that this swaps half a win for a gammon and a half, so no big deal!
20. WHITE: (6 2) Can't move
BLACK: (5 2) 5/Off 5/3
21. WHITE: (6 4) Can't move
BLACK: (6 1) 6/Off 6/5
22. WHITE: (6 4) bar/19 13/9
BLACK: (6 2) 5/Off 2/Off
23. WHITE: (6 4) 19/9
BLACK: (4 1) 4/Off 1/Off
24. WHITE: (4 3) 13/10 9/5
BLACK: (5 4) 5/Off 4/Off
25. WHITE: (6 5) 10/4 9/4
BLACK: (2 1) 2/Off 1/Off
26. WHITE: (3 1) 3/Off 1/Off
BLACK: (5 3) 5/Off 3/Off
27. WHITE: (4 3) 4/Off 3/Off
BLACK: (3 1) 3/Off 3/2
28. WHITE: (4 4) 4/Off(4)
BLACK: (3 1) 2/Off 1/Off
BushSucks wins 2 points.
Comments: 4

Articles in « Backgammon articles »
- What is backgammon?
- Backgammon code
- Improvers Corner Number One
- Improvers Corner Number Two
- Improver's Corner number three.
- Improvers Corner Number Four.
- What are your chances?
- An introduction to Tournament Backgammon
- Takhteh-Nard
- dorbel versus BushSucks Game One
- dorbel versus BushSucks Game Two
- dorbel versus BushSucks Game Three
- gnubg gammonline html output test
- Equity
- In doubt Capture
- Decision Analysis for Success - a course for students?
- New Dorbel Daily No 1.
 Sited by SoulTrade
I especially like the rules of thumb, like "Any time that you find yourself on the bar against a four point board and with another blot somewhere, you probably have a pass."
BTW, please note that the average reader will only look at the comments for the positions with pictures.
Not sure what socksey tried to ask, but if it's the abbrevations, I think I figured them out: S=Snowie, G=GnuBG, E=evaluation, R=rollout