
News:
Remember if you wish to share a pic or a story, with just a selected few, use the new extended profile with custom buddy list http://www.fibsboard.com/announcements/new-ultimate-profile-a-biopicdocumentsounds-area-that-can-only-be-seen-by-b/
Ads or Donors?

And so on to Game Three. Remember to set out your bg board and play each move along with the text. it will stick in your mind better like that.
Game Three
Match to 13. Score WHITE-BLACK: 0-6
BLACK: (4 2) 8/4 6/4
2. WHITE: (3 2) 13/10 13/11
*24/22, 13/10 is equally good.
BLACK: (5 5) 13/3(2)
3. WHITE: (6 3) 11/5 8/5
*Much better than making the bar!
BLACK: (4 2) 24/22 13/9
*Both players can see the potential to be trapped behind a prime here and are thus keen to get their back men on the move. Staying back is not a viable option. Black gets his first chance and has to choose between this and 24/18. Coming out to White’s bar looks more dangerous, but it fights for a valuable point and with his stronger board he may get the better of a blot hitting contest. The fact that White has no spare on the 8pt is important and if White hits on the bar he can’t simultaneously make a point inboard. Splitting to the 22pt is less likely to be hit but it means putting a blot on the 9pt which is vulnerable to 6-2 and 4-4, while White can also point on the head of the blot on the 22pt, very damaging. It’s a tough choice, perhaps decided by the old guideline, “If you are leaving a blot, put it where it will do most good when not hitâ€. Here that is clearly the 18pt and the rollouts support that. 24/22, 13/9 is a small error costing about 0.031ppg (G/SR)
4. WHITE: (2 1) 6/3*
*10/8, 6/5 is tempting, but second best.
BLACK: (6 5) Can't move
5. WHITE: Double (see diagram 9)
BLACK: Take
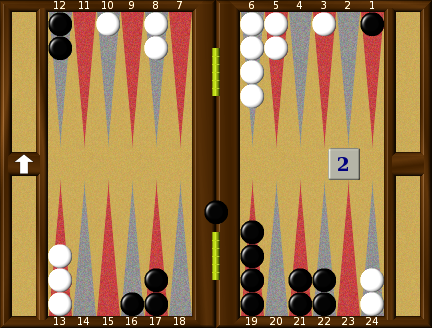
Diagram 9. White doubles to 2.
Black leads 6-0 to 13
Pipcount Black 138 White 150
Black is on the bar
White is just fractionally short of being in the doubling window. Most blitz doubles based on two point boards are feeble or not even doubles at all. Points to note are Black’s stronger home board and race lead, while White’s builders don’t combine very well and his back checkers aren’t split. One delight of using a bot for analysis is that you can shift checkers around to see what improvements are needed for a correct cube. Here you have to move a white checker from 24/23, one from 10/9 and one from 6/5. Now it’s a double, though still not very strong.
White’s double here is a very small error, but note that a 6% chance of a wrong pass is enough to make the cube correct.
6. WHITE: (6 2) 24/16*
A very tough play for White and I chose the hit, wrongly. It does put two men in the air and gains 16 pips in the race and that was why I went for it, but locking down the 4pt with 10/4, 6/4 is better in the end. It makes a clear and solid gain that will be an asset to White for the rest of the game, whereas the hit play may work well or may not, depending on Black’s next roll. The match play is an error costing about 0.074 (GS/R)
BLACK: (5 3) bar/22*
7. WHITE: (2 1) bar/23 24/23
*This might look a bit defensive, but it seems to be right (SE/GR). Shifting up to the 23pt anchor freezes the 8pt for a while with no builders in range to reinforce it. Bar/24, 10/8 is a reasonable alternate.
BLACK: (2 2) bar/23 13/11(2) 11/9*
*This looks like the best play, entering and hitting of course, then moving the blot from the midpoint to the more useful 11pt.
8. WHITE: (5 4) bar/16*
BLACK: (4 1) bar/21 22/21
9. WHITE: (4 3) 16/12 13/10
*White correctly tidies up. 13/10, 6/2* is second best; hitting loose behind an anchor is rarely correct at this stage.
BLACK: (4 2) 24/18
*Nothing else will do, Black has to get those loose checkers at the back into the game.
10. WHITE: (3 1) 12/8 (see diagram 10)
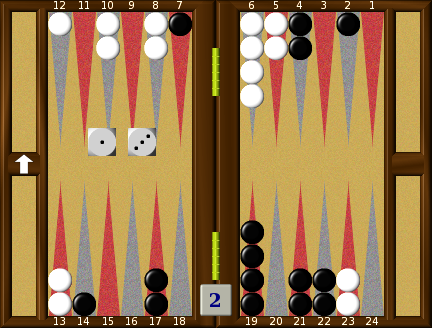
Diagram 10. White to play 3-1
Black leads 6-0 to 13
Pipcount Black 148 White 154
*Snowie will make the bar point, while Gnu will make the match play. The three blots after 10/7*, 8/7 (or 10/7*, 10/9) looked immediately vulnerable to a fatal shot from the bar to me, so I went for the solid play. It keeps down the gammon losses. GS/R supports the match play, with 10/7, 8/7 as a close alternate.
BLACK: (3 1) 23/22 11/8
*Both bots go for 21/18, 11/10 and rate any other play an error. That play improves the anchor and makes the outfield blot safer, at the risk of White being able to mount an effective blitz. With the bar anchor Black has an ideal point to cycle those back men out into the game and he cuts out the risk of being primed. The risk of being rolled away and closed out is less than it might look, requiring White to roll very well for the attack, then spring his back men, a long parley.
11. WHITE: (6 5) 13/7* 8/3*
BLACK: (3 3) bar/22*(2) 21/18*(2)
12. WHITE: (6 5) bar/20
BLACK: (6 4) 22/12*
13. WHITE: (4 1) bar/24
BLACK: (3 1) 8/5* 6/5
14. WHITE: (3 1) bar/24
BLACK: (5 3) 18/10
* 18/13, 12/9 is equally good.
15. WHITE: (6 3) Can't move
BLACK: (6 4) 22/12
*22/16, 18/14 is slightly better, freedom is the thing, so staying back on the 18pt has nothing to recommend it.
16. WHITE: (5 4) Can't move
BLACK: (6 3) 18/9 (diagram 11)
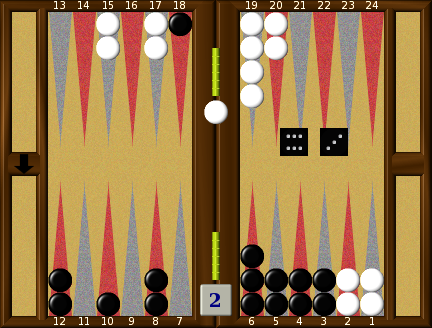
Diagram 11. Black to play 6-3
Black leads 6-0 to 13
Pipcount Black 112 White 189
White is on the bar
*Both bots will play 18/9, but their rollouts emphatically plump for 18/12, 10/7. Making the bar is still important to completely stifle White’s back men, while if White manages to hit the slot straight away it shouldn’t be too much of a problem. Making the bar has another very subtle advantage. Against a 1-2 backgame, a good technique is to stack lots of checkers on the bar point. Then when you have cleared the 8pt, you don’t have to play sixes or fives and you destroy the backgame players timing. The match play is an error costing about 0.049ppg (GS/R)
17. WHITE: (6 3) Can't move
BLACK: (6 2) 12/4
*Well it was right to slot the bar last time, so is it still correct? Snowie will do it, Gnu won’t and this time it’s one up to Snowie. Both rollouts go for 12/6, 9/7 with 10/4, 9/7 in second place. 12/4 is a small error costing about 0.038ppg (GS/R). Usually you want to avoid stacking a fourth checker on an inboard point, but here the damage that does is outweighed by the extra numbers it leaves to make the bar.
18. WHITE: (2 2) bar/23 10/8 6/4(2)
BLACK: (5 4) 10/5 9/5
*After this play, Black will blot on the 8 or 7pts next turn with 6-5, 6-4 and 5-5, while 3-2 and 2-1 will fail to clean up the blot on the 12pt. 12/8, 10/5 is better and the match play is probably an error of about 0.036ppg (GS/R)
19. WHITE: (3 1) 10/7 8/7
BLACK: (4 2) 8/4 8/6 (see diagram 12)
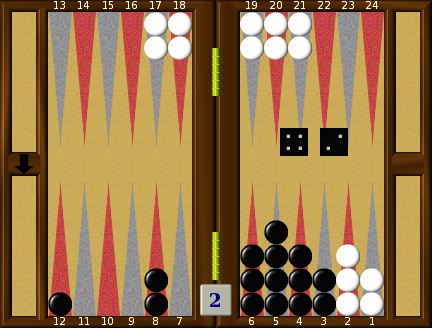
Diagram 12. Black to play 4-2
Black leads 6-0 to 13
Pipcount Black 84 White 177
*This one comes up often in various shapes and sizes. Black has a choice of clearing the 8pt now in return for five immediate shots or just playing safe and worrying about clearing the 8pt later. I can’t remember seeing a case where clearing the point was correct if you could safety the straggler, unless there was some element of a trap play, e.g, where the opponent’s board had crashed. Not in this case, being hit here is a disaster and in addition, Black has ten shots next turn that don’t safety the blot. 12/8, 5/3 (Snowie’s choice by a hair) would do very nicely if White was on the point of crashing, as it would allow Black another roll or two of safety, but that isn’t happening here and as usual he does best to get the 8pt ready to clear next turn if he can with 12/6. The match play is a big blunder costing about 0.147ppg (SE/GR). The guide line above (safety the straggler) will serve you well, but there is no substitute for laying out the various plays and ‘reading the numbers’. Learn to do it; it will win you games that otherwise go astray and it isn’t too hard if you practise
20. WHITE: (5 3) 23/15
*This sort of play is automatic at the top level, but worth highlighting. You run out because (a)a spare on an anchor is useless until it gets into the game, (b) it keeps your five prime in position and (c) it denies the straggler the option of waiting where it is. (c) doesn’t really apply here but the others do. Being hit doesn’t matter much either way; it helps the timing but probably loses a few extra gammons.
BLACK: (4 1) 12/8 4/3
*Nice play. It’s tempting to look for the usual problems with large doublets and try 12/8, 6/5 (or 5/4) to make 5-5 next safe, but in the long run and particularly if hit, 12/8, 4/3 for maximum spares and flexibility works best.
21. WHITE: (4 3) 15/12 7/3
*I was trying to be creative here and Gnu will make this play, but the dull 15/8 is probably best by a small margin. (SE/GR)
BLACK: (4 2) 8/4 6/4
*Both bots play 8/4, 5/3, but I don’t know why. The match play looks right to me and the rollout supports it by a small margin(GR). Flexibility is the key; a checker on the 3pt can only play threes, a checker on the 5pt can play fives, ones and twos. 8/6, 4/off would be horrid of course, blotting with some fours next turn.
22. WHITE: (2 1) 12/10 8/7
*Several other plays are equally good.
BLACK: (5 1) 5/Off 4/3 (see diagram 13)
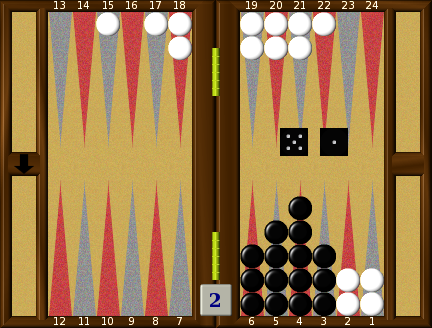
Diagram 13. Black to play 5-1
Black leads 6-0 to 13
Pipcount Black 67 White 159
The bots make this play, but it’s poor technique. The pros call this extended jeopardy, meaning that keeping the spare on the 6pt extends the risk into the future. Better to play 6/off and get ready to clear the point next turn. This risks an immediate 6-5 or 6-4 of course but that is a risk that you will probably have to run later anyway. Take it now, in return for the major reward of clearing the point next turn with the other sixes and combinations of 3-2-1. Also, moving a checker from the 4pt to the 3pt can’t help as we have seen. 5/off, 4/3 is a small error costing about 0.033ppg (GS/R) Compare this play to Game 1, Move 15 White. There it is incorrect to strip the bar because (a) you can’t clear it next turn with sixes and (b) White still wants to make the 3pt before the bearoff starts.
23. WHITE: (6 1) 10/3
*This looks automatic but the bots don’t like it with evaluation or rollout. GR likes 10/9, 7/1, SR prefers 10/9, 8/2. What can it all mean? Perhaps it is this. Up to now White has been trying to roll a five prime forward, relying on the prime to win. However that plan now has a limited life. He won’t get a shot next turn, so perhaps he should now be concentrating on making a closed board and one of the bot plays may be best to do that. Your guess is as good as mine. I will probably still play 10/3 next time and reserve judgment on this one.
BLACK: (4 2) 6/Off
24. WHITE: (6 4) 8/2 7/3
BLACK: (5 1) 5/Off 4/3
25. WHITE: (6 3) 23/14
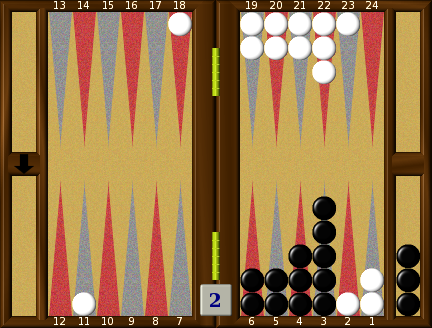
Diagram 14. Black on roll. Cube action?
Black leads 6-0 to 13
Pipcount Black 49 White 133
Black has three men off.
* Worth taking a look to see what Black should be doing with the cube that he owns. You might think that he is playing on for a gammon because he is too good to double. In fact he is nowhere near good enough! For money, this is a correct redouble and White should pass, but at this score things are very different. Cube ownership is vital, keeping Black in the game if he gets hit, winning lots of games later when he has a correct cash and most of all, not having to face the horrible possibility of seeing an 8 cube being winched into position if White can hit a shot soon. No double/take.
25. BLACK: (3 3) 5/2*(2) 3/Off(2)
*6/3(2), 5/2*(2) is correct, winning more games and more gammons. Clearing two points and avoiding the gap on the 5pt are more important than bearing off two checkers. The match play is an error costing about 0.043ppg.
26. WHITE: (4 2) Can't move
BLACK: (5 1) 6/Off
27. WHITE: (6 5) bar/19* 7/2
BLACK: (4 1) bar/24
28. WHITE: (5 3) 24/16
*Forcing Black to expose another blot with most threes.
BLACK: (1 1) 4/3(3) 3/2 (see diagram 15)
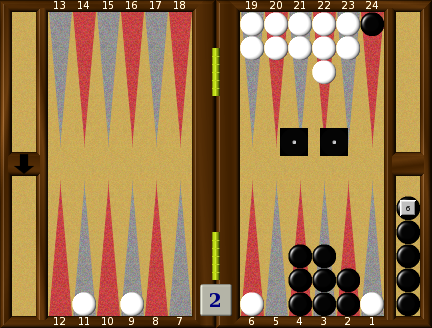
Diagram 15. Black to play 1-1.
Black leads 6-0 to 13
Pipcount Black 49 White
Black has six men off
* Black needs to put White on the roof. He may gain a tempo to spring his straggler if White dances and White may also enter on the 20pt or 19pt, which will get him out of Black’s hair for the moment. 3/1*, 2/1(2) is the play and the match play is a mistake costing 0.024ppg. It may look awkward, but the bad numbers next turn (5-2, 4-2, 3-2, 2-2) are the same numbers that blot after the ‘safer’ play! Hitting also wins a few extra gammons!
29. WHITE: (6 4) 19/13 16/12
*I stayed back here to try to pick up a second checker, but the priority is probably to get a shot at Black if he rolls a 6. 24/20, 19/13 is probably best. Notice how these checkers cover the White outfield nicely, without giving Black an indirect shot, 6-6 excepted of course. All the plays here are very close.
BLACK: (5 1) 3/2
30. WHITE: (5 2) 12/7 3/1*
BLACK: (2 2) Can't move
31. WHITE: (6 3) 24/21 7/1
*It looks tempting to make the 6-prime with something like 13/10, 7/1 in the hope of picking up a second checker, but White is a pretty solid favourite without that and if not completing the close-out now, may never do so in the future. White probably makes the best play here.
BLACK: (5 2) Can't move
32. WHITE: (4 4) 21/9 14/10
*14/6, 13/5 is probably a bit better, White wants his spares on the highest points to keep his board as long as possible.
BLACK: (6 2) Can't move
33. WHITE: (6 3) 13/4 (see diagram 16)
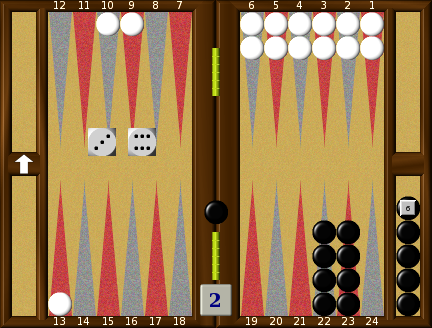
Diagram 16. White to play 6-3.
Black leads 6-0 to 13
Pipcount Black 49 White 74
Black has six men off
*13/7, 9/6 is to be preferred, see last comment. White is trying to protect himself against 6-6 next, but he doesn’t need to do that as Black has no board. Best to get at least one man on the 6pt in order to keep his board as long as possible in the bear off. This is quite typical in this situation. The match play is a clear error costing 0.053ppg, GS/R.
BLACK: (3 2) Can't move
34. WHITE: (3 2) 10/8 9/6
BLACK: (5 3) Can't move
35. WHITE: (4 1) 8/4 6/5
BLACK: (6 5) Can't move
36. WHITE: (3 2) 5/Off
BLACK: (3 1) Can't move
37. WHITE: (4 4) 4/Off(4)
BLACK: (6 2) Can't move
38. WHITE: (6 4) 6/Off 6/2
BLACK: (4 2) bar/21 3/1
39. WHITE: (3 3) 5/2(2) 3/Off(2)
BLACK: (3 2) 21/16
40. WHITE: (3 2) 2/Off(2)
BLACK: (3 2) 16/11
41. WHITE: (5 3) 2/Off(2)
BLACK: (6 6) 11/Off 3/Off(2)
42. WHITE: (5 4) 2/Off 1/Off
BLACK: (4 2) 3/Off 2/Off
43. WHITE: (6 4) 1/Off
Dorbel wins 2 points.
Comments: 4

Articles in « Backgammon articles »
- What is backgammon?
- Backgammon code
- Improvers Corner Number One
- Improvers Corner Number Two
- Improver's Corner number three.
- Improvers Corner Number Four.
- What are your chances?
- An introduction to Tournament Backgammon
- Takhteh-Nard
- dorbel versus BushSucks Game One
- dorbel versus BushSucks Game Two
- dorbel versus BushSucks Game Three
- gnubg gammonline html output test
- Equity
- In doubt Capture
- Decision Analysis for Success - a course for students?
- New Dorbel Daily No 1.
 Sited by SoulTrade
I'm not so sure about this. Actually I feel that clearing the point is almost always correct... You don't have to make big changes to the position that will make clearing the point better. For example if you change back game anchors to 3-2 clearing is better. Or if you break two points (bar and