
News:
Play our New Fibsboard Position of the Week --> perhaps give your comments/reasons thx..here's the link http://www.fibsboard.com/position-of-the-week/

-------------------------------------------------------------------
The Fibsleagammon Masters Final, Session 36
dorbel (WHITE) vs. BushSucks (BLACK)
13 point Match
--------------------------------------------------------------------
This is an experiment to see whether fibsters want to look at annotated matches. This game is the first of a thirteen point match between myself and BushSucks and it came in a fibsleague playoff final. I have annotated all the plays and hopefully you are going to get to see some diagrams too. I recommend setting up a board and moving the checkers with each roll to get the most from it.
[Some abbreviations. Ppg is short for points per game. Thus “an error costing 0.06ppg†means that on average the error will cost you 6/100ths of a point. G/SE means that the conclusions in the text are based on the combined evaluation of GnuBg and Snowie, with Gnu set to 2-ply and Snowie to 3-ply. G/SR means the combined results of rollouts from GnuBg and Snowie. SE/GR means that I have combined Snowie evaluation with a Gnu rollout.]
----------------------------- Game 01 ------------------------------
BLACK: (5 2) 13/8 13/11
*24/22, 13/8 is equally good.
2. WHITE: (4 2) 8/4 6/4
BLACK: (3 3) 8/5(2) 6/3(2)
3. WHITE: (5 3) 13/8 13/10
*The first error of the match, as White decides against the more obvious and correct 8/3, 6/3. I have a particular dislike of the formation with five checkers on the midpoint and one on the 8pt, finding it very difficult to develop generally. Here however, it is better to take the concrete gain of making the 3pt and live with the awkward distribution.
BLACK: (3 3) 13/7(2)
4. WHITE: (5 3) 10/5 8/5
BLACK: Double (See diagram 1)
4. WHITE: Take
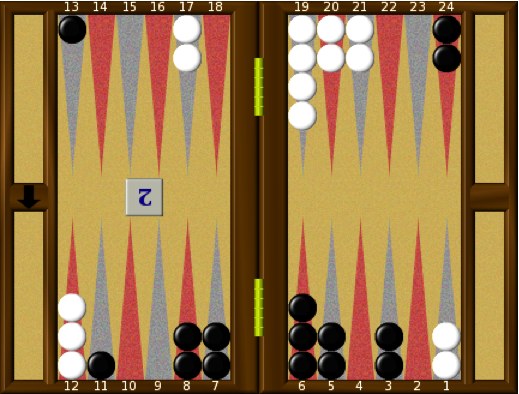
Diagram 1. Black doubles to 2.
Score Black 0 White 0 to 13.
Pipcount B 136 White 145.
*A very weak double. Black leads by 9 pips, not very significant, while the positional strengths look about equal and it is hard to see Black losing his market after the next exchange. Cubeless Black wins 57% from here, including 19 gammons, nowhere near enough for a cube in such a static position(G/SE). Note that this is very likely to become a prime v prime battle, where cube ownership is more important than at any other time. You can be an underdog with the cube in the middle but a clear favourite owning it! The double is a blunder costing about 0.183ppg (G/SE)
BLACK: (6 4) 24/18 13/9
*Black makes a bid for freedom, but this play has a fundamental flaw. White can and should hit one of Black’s four blots with every roll! This just can’t be right and Black should just play the creative 13/9, 11/5. GE makes the match play a close alternate, but it is in fact the third or fourth best play costing 0.038ppg (G/SR).
6. WHITE: (3 1) 24/21 8/7*
BLACK: (2 1) bar/24 6/4*
7. WHITE: (2 1) bar/23 8/7
BLACK: (1 1) 24/23 4/2*/1*
* Black’s play is based on a common principle in this sort of game, which is, “Don’t allow your opponent complete freedom of movement.†Putting two men on the roof and splitting at the back does that nicely, but it leaves Black with a lot to do on both sides of the board. It’s close, but he probably does a little better to go for the simple 24/22(2), so that he can concentrate on fighting for his 4pt without worrying about the other side of the board. The match play is probably a small error costing about 0.035ppg (G/SR)
8. WHITE: (2 2) bar/21(2)
BLACK: (4 3) 11/7 9/6
*Slightly superior to 11/8, 9/5.
9. WHITE: Double (see diagram 2)
BLACK: Take
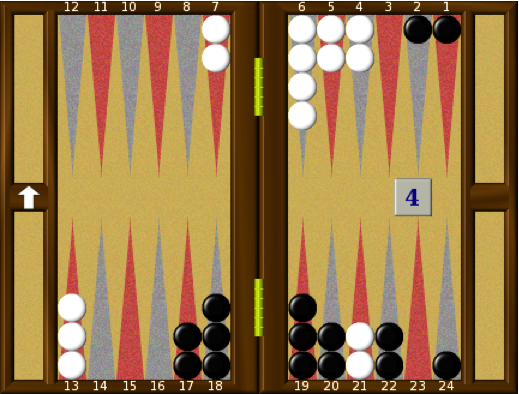
Diagram 2. White redoubles to 4
* Although White trails by 18 pips and still has two checkers behind a four prime, this is a strong redouble. This is because all White’s checkers are in play and his own four prime can improve, whereas Black already has three men more or less out of play behind White’s anchor. Correct take for Black, with a race lead and a four prime of his own.
10. WHITE: (5 4) 7/2* 6/2
BLACK: (1 1) bar/24 6/5 3/1
*There are several things that Black can try with this, all more or less equal as long as he keeps his four prime. The bots will play bar/24, 7/6, 3/1, but I couldn’t say why!
11. WHITE: (5 1) 13/7
BLACK: (6 4) 7/1 7/3
*Black avoids the temptation to bury two more checkers with 7/1, 5/1, but 8/2, 7/3 is more accurate than the match play, making a fourth point and starting a fifth. An error costing about 0.035ppg (SE & GR).
12. WHITE: (6 3) 21/15 21/18*
*White must hit of course and choose a 6. 21/15 is the most likely to win, while 13/7 or 18/12 will win more gammons in exchange for a few losses. There’s no real way to quantify that over the board so it tends to come down to temperament! GR and SE agree that the match play is best by a very small margin.
BLACK: (6 5) Can't move
13. WHITE: (6 5) 18/12 15/10
*15/4 is technically better than this (GR & SE), providing an extra builder for the 3pt, but it doesn’t matter much.
BLACK: (2 1) bar/22
14. WHITE: (6 6) 13/7(2) 12/6 10/4
BLACK: (6 3) 22/13
*The bots play 22/16, 5/2 but humans know not to waste pips in these situations and 22/13 is correct by a small margin.
15. WHITE: (2 1) 7/5 6/5 (see diagram 3)
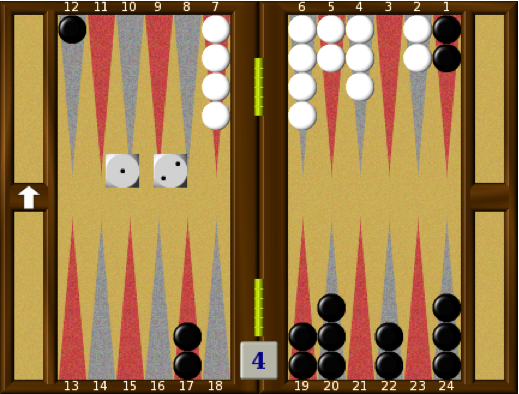
Diagram 3. White to play 2-1.
*Alert play by White. Stripping the bar now with 7/5, 7/6 blots next turn with 6-5, 5-5 and 5-4, as well as offering fewer numbers to make the 3pt. There’s lots of equity up for grabs in these late bear-in positions, so take your time and “read the numbersâ€, i.e. scan through your next rolls and look for difficulty, particularly with doublets and large rolls.
BLACK: (6 1) 13/7 5/4
*Good play. Black gives up a crossover to start the 4pt. Making it will be hugely valuable if he can hit a shot later.
16. WHITE: (5 3) 7/2 5/2
BLACK: (5 1) 8/2
*Another accurate play from Black. It might look aggressive to slot a second point, but it works. Beginners are frightened to leave blots here, in case they hit a shot next turn, but for that to be a problem you have to get a shot (8.5%) and hit it (36%). That parley is a 3% chance and even then you will usually cover one of the blots!
17. WHITE: (6 2) 6/4
*Looks like a small mistake here, with SE and GR both preferring 4/2. The plays have the same number of blot rolls next (7), so 4/2 must lead to a position that is easier to play later, or perhaps just delays problems until Black’s board has crashed. I don’t know any way to figure this out over the board.
BLACK: (3 2) 8/6 7/4
18. WHITE: (6 3) 5/2
BLACK: (4 3) 6/2 6/3
19. WHITE: (2 2) 7/3(2) (see diagram 4)

Diagram 4. White to play 2-2.
*This play looks so obvious, but it’s a substantial error costing about 0.057ppg (SE/GR). 7/5(2), 2/off(2) is the play, bearing off two checkers and leaving two nice spares on the 5pt, in return for leaving a gap on the 3pt. That’s a good trade in any circumstances and particularly here where Black’s board is going down the tubes as of now. The moral here is, don’t grab at “obvious†plays. You can avoid this trap by asking yourself, “What is my second best play?†If you don’t know the answer to that, how do you know that the play that you are making is best? This is an error made while playing too quickly. I might have made the same play even with more thought of course, but that’s allowable. Not thinking isn’t. It was noticeable throughout the match that BushSucks played more slowly than me, a factor in his win I think.
BLACK: (5 4) 6/1 5/1
20. WHITE: (5 5) 5/off(2)
*Note how with a better play on my previous turn I’d have six checkers off now, not two!
BLACK: (4 2) 24/18
21. WHITE: (6 1) 6/Off 6/5
*Probably right, but 6/off, 4/3 is also good, with a safer bearoff when not hit. That play leaves two extra shots of course (4-1), but if Black hits with that, he can’t lift his blot on his 5pt which is cute!
BLACK: (4 1) 24/20* 5/4
22. WHITE: (2 1) Can't move
BLACK: (6 3) 20/17 18/12
*Both bots play 20/14, 18/15, but GR supports the match play, which guarantees Black a direct shot if White enters with any 6.
23. WHITE: (4 4) Can't move
BLACK: (6 2) 17/9
*17/11, 12/10 is better by 0.055 (G/SR), getting the checkers closer to home. This is better for the bear-in and also leaves four numbers (6-5, 5-4) to make another point. The match play leaves only three.
24. WHITE: (5 3) bar/20 4/1
BLACK: (1 1) 9/5*
25. WHITE: (1 1) Can't move
BLACK: Double (see diagram 5)
25. WHITE: Pass

Diagram 5. Black redoubles to 8.
*Excellent redouble. I gave this one plenty of thought, but in the end just over-estimated Black’s winning chances. I thought that he could win this 78-80% of the time, making for a marginal take/pass, but the real figure is 73.4% (G/SR). It’s an easy take and passing hands Black about 0.187ppg. All I could see in my mind’s eye was dancing again and even one more turn on the bar makes for a big pass. A basically straightforward position complicated by the possibilities of getting a shot and my second blot inboard. Snowman phobia was a factor. I might have been more optimistic if it had been a two cube!
A final thought on this cube; after a take White’s window on a 16 cube opens at 50% of course and he should turn it with any market losing sequence at all. Black can take with 15% chances of a win. E.g. After Black 6-5, 12/6, 5/off, White 6-4, bar/19*/15, Black 6-5, bar/14, White is about 78% to win and can reship a takeable cube at 16. You need to have these figures clear in your mind before taking a large cube, or you won’t get the full value from it.
BushSucks wins 4 points.
Comments: 3

Articles in « Backgammon articles »
- What is backgammon?
- Backgammon code
- Improvers Corner Number One
- Improvers Corner Number Two
- Improver's Corner number three.
- Improvers Corner Number Four.
- What are your chances?
- An introduction to Tournament Backgammon
- Takhteh-Nard
- dorbel versus BushSucks Game One
- dorbel versus BushSucks Game Two
- dorbel versus BushSucks Game Three
- gnubg gammonline html output test
- Equity
- In doubt Capture
- Decision Analysis for Success - a course for students?
- New Dorbel Daily No 1.
 Sited by SoulTrade
Regards